Operation Jubilee and Canadian Signals
Operation Jubilee, also known as the Dieppe Raid and earlier as Operation Rutter, was an Allied attack on the German-occupied port of Dieppe during the Second World War.[1] The raid occurred on 19 August 1942 and involved British, Canadian and American forces. The Signals components of the Canadian force involved in Operation Jubilee were elements of 2nd Canadian Divisional Signals (2 Div Sigs) and 1st Canadian Army Tank Brigade Signals (1 CATB Sigs).[2]
The intent of this page is to address the aspects of the operation pertaining to the Royal Canadian Corps of Signals. For a detailed description of the overall Canadian actions during Operation Jubilee, a good source of information can be found at Veterans Affairs Canada.
The Operational Plan
Originally conceived in April 1942 by Combined Operations Headquarters and code named Operation Rutter, the Allies planned to conduct a major division-sized raid on a German-held port on the French Channel coast and to hold it for the duration of at least two tides, and to destroy enemy facilities and defences before withdrawing. Approved by the chiefs of staff in May 1942, it included British parachute units attacking German artillery batteries on the headlands on either side of the Canadians making a frontal assault from the sea. The parachute operation was later cancelled and instead commando units would land by sea and attack the artillery batteries.[1]
The principle formation selected to conduct the raid was 2nd Canadian Infantry Division. The units selected to participate in the raid were:[3]
:4th Canadian Infantry Brigade- The Essex Scottish Regiment
- The Royal Hamilton Light Infantry
- The Royal Regiment of Canada
- 5th Canadian Infantry Brigade
- Three platoons, The Black Watch (Royal Highland Regiment) of Canada
- Mortar Platoon, The Calgary Highlanders
- 6th Canadian Infantry Brigade
- Les Fusiliers Mont-Royal
- The Queen's Own Cameron Highlanders of Canada
- The South Saskatchewan Regiment
- No. 6 Defence Platoon (Lorne Scots)
- 14th Army Tank Regiment (The Calgary Regiment (Tank))
- Detachment, 3rd Light Anti-Aircraft Regiment, RCA
- Detachment, 4th Field Regiment, RCA
- The Toronto Scottish Regiment (Machine Gun)
- No. 3 Commando
- No. 4 Commando
- No. 10 Inter-Allied Commando
- A Commando Royal Marines
- No. 30 Commando
- No. 40 Commando
- Detachment of 1st U.S. Ranger Battalion
Armoured support was provided by the 14th Army Tank Regiment (The Calgary Regiment (Tank)) with 58 of the new Churchill tanks, to be delivered using the new tank landing craft (TLC)[4]. The tanks had a mixture of armament with QF 2 pounder gun–armed tanks fitted with a close support howitzer in the hull operating alongside QF 6 pounder–armed tanks. In addition, three of the Churchills were equipped with flame-thrower equipment and all had adaptations enabling them to operate in the shallow water near the beach.[1]
The 2nd Canadian Divisional headquarters was in control of the land forces but was to remain afloat aboard HMS Calpe and HMS Fernie. All told, Canadians made up the great majority of the attackers in the raid. Nearly 5,000 of the 6,100 troops were Canadians with the remaining troops consisting of approximately 1,000 British Commandos and 50 American Rangers.
Navel support comprised 237 ships and landing craft including eight Hunt-class destroyers - Albrighton, Berkeley, Bleasdale, Brocklesby, Calpe, Fernie, Garth, and ORP Ślązak of the Polish Navy - and nine landing ships, infantry - Duke of Wellington, Glengyle, Invicta, Prince Charles, Prince Leopold, Princess Beatrix, Princess Astrid, Prins Albert and Queen Emma.[3]
Air support consisted of 74 Allied air squadrons including eight from the Royal Canadian Air Force.
The Signals Plan
The wireless plan for Dieppe was magnificent in its thoroughness and attention to detail. Senior members of 2 Canadian Infantry Divisional Signals staff had begun planning on 17 May and there had been three full-scale exercises prior to the cancellation of operation "RUTTER" on 7 July. In his report to the Commander-in-Chief, Home Forces, Vice-Admiral Lord Louis Mountbatten stated that, "army signal communications were of a higher standard of efficiency than in any previous exercises I had seen."[5]
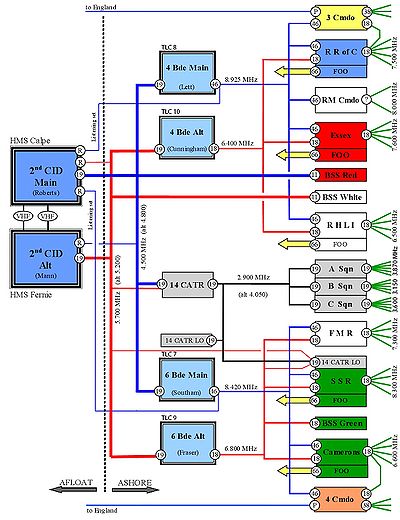
The signal plan contained over 100 percent redundancy.[6] Both the Main Divisional Headquarters in HMS Calpe and the Alternate in HMS Fernie were to establish direct links to both brigades ashore using WS No. 19. In addition, there were to be three Beach Signal Stations[7] with links back to the headquarters ships as well as extra R107 "listening sets" to permit the Headquarters to monitor the brigade/battalion nets directly.Each brigade, supported by members of their affiliated section from 2 Div Sigs, was to have a separate Main and Alternate Headquarters and each of these were to have their own links to the battalions. The brigade main headquarters was equipped with a WS No. 19 for communicating back to divisional headquarters aboard HMS Calpe and a WS No. 46 - a new simple and compact set developed specifically for beach assaults – for communicating forward to the battalions ("A" wave sets). The alternate headquarters was equipped with a WS No. 19 for communicating back to alternate divisional headquarters aboard HMS Fernie and a WS No. 18 for communicating forward to the battalions ("B" wave sets). In order to enable them to be taken ashore, the WS No. 19 were mounted on two-wheeled "baby carriages" (handcarts built on Barrows Drum WD).
The infantry battalions had their standard Wireless Sets No. 18 manpack sets plus the Wireless Set No. 46. Each battalion headquarters was augmented by three members of their brigade section from 2 Div Sigs in support.
Communications within the tank regiment were provided by the heavy but powerful Wireless Sets No. 19. Members of 1 CATB Sigs were in support of the tank regiment. In addition to the tanks, there were to be scout cars using equipped with WS No. 19. Three scout cars were tasked specifically to report to Brigadier Southam's 6th Infantry Brigade Headquarters at St Remy Church to coordinate the withdrawal between infantry and tanks.
The Forward Observations Officers (FOOs) ashore were to have their own links to their supporting destroyers. The navy’s own wireless network was to maintain control over all of the ships and to be in communications with their own Naval Beach Signal Stations ashore. The Royal Air Force was to have a direct link from the headquarters ships to squadrons arriving overhead to permit adjustments in targeting to meet immediate needs.[8] The 2 CID signals staff seemed to have made contingencies for all possible situations.
Execution
An old military adage states that plans seldom survive initial contact with the enemy and for the Dieppe communications plan, this was certainly the case. Of the 75 or so wireless sets known to have been used by the infantry, fewer than 20 sets survived initial contact to play any significant role. Examination of the actual communications shows that the loss of only a few more sets would have cut communications entirely.
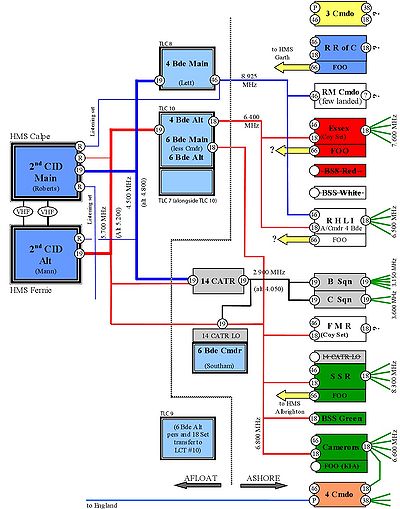
The equipment onboard HMS Calpe and HMS Fernie worked very well with a total of thirty-two sets provided for communications and navigation.[9] The Wireless Sets No. 19 had more than enough range to reach the beach and these sets worked without problem. The R-107 "listening sets" on the brigade/battalion "A" wave nets were not very effective. For 4th Canadian Infantry Brigade (4 CIB) this net only had the RHLI and possibly the Marines as outstations. For 6th Canadian Infantry Brigade (6 CIB) the brigade/battalion "A" wave control station was damaged on landing with the result that this net never became effective. In addition, the operators on the headquarters’ listening sets were clerks rather than combat arms specialists. Had more experienced personnel manned these sets, they might have been able to follow the progress of the raid simply by monitoring the wireless traffic.[10] Notwithstanding that the wireless equipment was working properly, the amount of useful information reaching the Divisional Commander proved to be minimal.The Brigade Headquarters were very weak links in the communications chain. While the plan called for each brigade to have a main and alternate headquarters ashore, none of these operated successfully from the beaches. 4 CIB Main operated from Tank Landing Craft (TLC) 8 with its wounded commander (Lett) on a stretcher. He passed acting command of the brigade to LCol Labatt of the RHLI on WHITE beach. 4 CIB Alternate was operating from TLC 10 but was only in contact with two of their five battalions. 6 CIB Main had only its commander (Southam) ashore while the remainder of his headquarters remained afloat. Brigadier Southam was forced to use the facilities of the 14 CATR Liaison Officer’s scout car HUNTER which provided a tenuous link to both HMS Fernie and to three of the battalions ashore. 6 CIB Alternate did not land and remained for a time in TLC 9. The brigade headquarters afloat managed to consolidate on TLC 10 which eventually held 4 CIB Alternate, 6 CIB Main (less their Commander) and 6 CIB Alternate. Had anything happened to that single landing craft, the consequences to the communications chain would have been catastrophic.
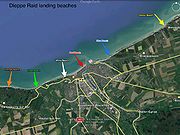
At least two of the FOOs were in contact with their supporting destroyers. Unfortunately, neither of them had a clear view of their targets with the result that they were unable to accurately adjust fire. This had disastrous consequences on both BLUE and GREEN beaches in that neither of the headlands overlooking the main beach at Dieppe ever came under Canadian control.
The Beach Signals Stations did not operate successfully. The one destined for RED beach was sunk offshore while the one destined for WHITE beach was damaged before landing and never went on the air. The progress of the one on GREEN beach is uncertain. It may have operated successfully however, as it was on the brigade/battalion net which was operating well on GREEN beach anyway, this station would not have added materially to the progress of the battle.
Within the battalions, few details are certain. In most cases the wireless sets with their ten-foot long antennae became very attractive targets for the Germans and many of the sets and the operators became casualties. Battalion rear-link operators retuned the surviving company sets to maintain contact with Brigade as long as possible. There was no direct wireless link from the infantry to the tanks and in fact, the sets used by these two groups were quite incompatible as the 46 Set could not be retuned at all and the 18 Set could not be retuned to any frequency in use by 14 CATR. Close cooperation between the infantry and armoured forces via wireless was non-existent in August 1942.
Within 14 CATR, the wireless sets worked well and it is likely that at least 23 of their Wireless Sets No. 19 were still operational until the end of the raid. Any of these could have been turned into a safe, high-powered beach signals station had any of the operators chosen to do so. Major Rolfe, the 14 CATR LO, did this from his scout car and kept Brigadier Southam in contact with 2 CID, 14 CATR, 6 CIB Main and Alternate plus his three infantry battalions (FMR, SSR and QOCH). The fact that members of 1st Canadian Army Tank Brigade back in England, over 70 miles away, clearly monitored Major Rolfe’s transmissions[11] confirms the effectiveness of these sets.
There was at least one shortcoming with the signals plan. The Wireless Set No. 46 used by the battalions was so simple that anyone could use it. It addition, it was the smallest and lightest set on the beach however, the 46 Sets were operating using crystal control on 8.925 MHz and 8.420 MHz, which was above the highest frequency that the Wireless Set No. 19 could use. It was, therefore, not possible for the headquarters' ships or the tanks to join any of the brigade/battalion 46 Set nets in an emergency. Further, there was no set provided to allow the headquarters’ ships to join the battalions’ 18 Set nets. This meant that all communications from the battalions had to go through the Brigade HQ afloat. This delayed and corrupted information reaching the Div HQ.
To summarize, the very thorough communications plan began to crumble as the landing craft approached the beaches. Throughout the raid, wireless contact was maintained with all of the major units ashore, however, this network depended on only a handful of sets - three of them being on a single landing craft. This meager system was all that Major-General Roberts had available to control an entire division conducting an amphibious assault.
Overall Communications System Performance
A communications system consists of suitable equipment, trained personnel and effective procedures. At Dieppe, none of these was totally successful. As detailed above, the equipment itself did work quite well. Unfortunately, not enough of it survived to meet the need fully. The same can be said for the signals personnel who, as long as they survived, used their initiative and skill to rearrange their remaining assets to provide critical communications links. However, some procedural problems played a critical role in the outcome of the raid. This was a significant failure.
One of the key procedures in message handling is that of counting the number of words in the message. This had been a standard procedure since the mid-1800s and had been given considerable emphasis in military training manuals for many years.[12] While counting words in the middle of a battle may seem an unnecessarily rigid procedure, it was the standard means of preventing a message from becoming corrupted.
Major-General Roberts committed the FMR to the battle based on faulty information. The log of the "listening set" on HMS Calpe noted the Essex sending a message to the RHLI stating, "12 of our men in the buildings. Have not heard from them for some time." In the Intelligence Log on HMS Fernie this was recorded as, "Essex Scots across the beaches & in houses."[13] There is a huge difference between a report of a section being in the town and the suggestion that the entire battalion was in the town. Based on the more optimistic report, Major-General Roberts sent the FMR to reinforce what he believed to be success.
Procedural errors, in part, led to the abandonment of the RRofC on BLUE beach. As the evacuation was being organized, a message was sent to the Boat Pool Officer, Cmdr. McClintock. As drafted, the message said, "If no further evacuation possible, withdraw to 4 miles from shore". The message received by Cmdr. McClintock was, "No further evacuation possible, withdraw".[14] Again, the loss of a few words made an enormous difference to the order and contributed to a situation in which no further attempt was made to evacuate the RRofC.
Notwithstanding the basic strength of the Signals Plan, there were some very complex procedures required of some operators. For example, on initial landing, if the SSR was unable to contact 6 CIB, they were to request the assistance of the 14 CATR LO on GREEN beach. He was to do the following:
- "The Tk L.O. (Capt. Miller), Code Name 'Alec,' who lands with the S. Sask. R., has a No. 19 Set in a Bren carrier. The blue flick of this No. 19 Set will be set to the Tk. Bn. command wave. The red flick will be set to Div. B wave. Capt. Miller will tune this set to work S. Sask. R. No. 18 Set working on 6 Cdn. Inf. Bde. B wave. He will get progress reports from S. Sask. R. on this wave and will retransmit them over the Div. B wave to Force H.Q. As H.Q. 6 Cdn. Inf. Bde. is also on the Div. B wave with a No. 19 Set, they will get the progress reports of S. Sask. R. H.Q. 6 Cdn. Inf. Bde. should retransmit such reports over their own bde. waves to other bns. of the bde. still afloat. When H.Q. 6 Cdn. Inf. Bde. is able to work S. Sask. R. direct on the bde. A and B waves, H.Q. 6 Cdn. Inf. Bde. will inform Alec on the Div. B wave, whereupon Alec will leave the Div. B wave and rejoin the Tk. Bn. command wave. Capt. Miller will liaise with Sigs. S. Sask. R. while afloat, to make sure of details."[15]
Clearly, Capt Miller was going to be a very busy fellow! It is doubtful whether any operator could carry out those tasks under combat conditions.
There was one case where a very complicated procedure was improvised and completed successfully. This was Major Rolfe’s work in providing communications for Brig. Southam using one wireless set on at least three different nets. However, Major Rolfe was not an ordinary Signals Officer. He had joined the RCCS as a “boy” in 1927, served as an operator with the North-West Territories and Yukon Radio System, been commissioned in 1940 and was serving as the Commanding Officer of 1st Canadian Army Tank Brigade Signals.[16] His skill set and experience was certainly not the sole product of the wartime training system.
While the components of the Dieppe communications system were fragile, the weakest link was near the top. The "Lessons Learnt" [sic] section of the Combined Operations Report puts great emphasis on the future need for "control and communications arrangements … of the highest order". It further states that the commander must have a "constant series of accurate pictures of the situation on shore." The report recommends specially fitted headquarters ships with adequate specialist staff to sort through information from all sources. Finally, the report emphasizes the necessity of improvising a communications system from whatever resources are available. Had this been done with the 19 Sets in the tanks, the true situation on RED and WHITE beaches might have been better understood. Overall, the arrangements for 2 CID HQ to receive, process and present information were inadequate and Major-General Roberts operated in a state of uncertainty and confusion.
Unit Perspectives
"A" and "M" Sections, 2 Div Sigs
- To be written
"J" Section, 2 Div Sigs
There were 23 members of "J" Section of 2 Div Sigs assigned to support the 4th Infantry Brigade for the landings. Fourteen were assigned to the main and alternate brigade headquarters and nine were assigned to support the infantry battalion headquarters, three for each battalion.
Supporting the Brigade Commander (Brigadier Lett) and the main Brigade Headquarters were seven members led by Captain Warner who were aboard TLC-8. Supporting the Brigade Major and the alternate Brigade Headquarters were seven members led by Sergeant Hart who were aboard in TLC-10. Of the 14, three were wounded.The Signallers attached to the battalions did not fare well. On WHITE Beach, of the three with The Royal Hamilton Light Infantry, one was killed in action and the other two were taken as prisoners of war. On RED Beach with The Essex Scottish Regiment, all three were taken as prisoners of war. On BLUE Beach with The Royal Regiment of Canada, two were killed in action while the third died of wounds after returning to England.
All told, of the 23 members of "J" Section, three were killed in action, one died of wounds, five were taken prisoner and three others were wounded.
For their actions, Sgt Hart, Sigmn Crosby and Sigmn Gilbert were awarded the Military Medal; Capt Warner, Cpl Reekie, L/Cpl Hunter, Sigmn Lacusta and Sigmn Ness were Mentioned in Despatches.
"L" Section, 2 Div Sigs
There were 23 members of "L" Section of 2 Div Sigs assigned to support the 6th Infantry Brigade for the landings. Fourteen were assigned to the main and alternate brigade headquarters and nine were assigned to support the infantry battalion headquarters, three for each battalion.
Supporting the Brigade Commander (Brigadier Southam) and the main Brigade Headquarters were seven members led by Sergeant Scott who were aboard TLC-7. Supporting the Brigade Major and the alternate Brigade Headquarters were seven members led by Captain MacLean who were aboard in TLC-9. Of the 14, one was killed in action, five were taken prisoner and three were wounded.The Signallers attached to the battalions did not fare well. On GREEN Beach, of the three with The South Saskatchewan Regiment, one was killed in action and the other two were taken as prisoners of war. With The Cameron Highlanders of Canada, one was taken as a prisoner of war while the other two made it back to England. On WHITE Beach with the Fusiliers Mont-Royal, two were killed in action while the third returned to England.
All told, of the 23 members of "L" Section, four were killed in action, eight were taken prisoner and three others were wounded. For his actions, Sigmn Ray was awarded the Military Medal.
1 Canadian Army Tank Brigade Signals
Supporting 14th Army Tank Regiment (The Calgary Regiment (Tank)) were 14 members of 1st Army Tank Brigade Signals led by Major Rolfe along with three Daimler Scout Cars, HUNTER, HOUND and HARE. Major Rolfe commanded 1 CATB Signals and normally wouldn't be in support of a single unit however he was involved in the planning of the operation and was thus implicated. The scout cars were in the back of their respective TLC along with three tanks in front. Hooked to the last of the tanks, the scout cars were to be towed onto the beach by means of a tow rope and then released. Like other aspects of the raid, things didn't go according to plan.
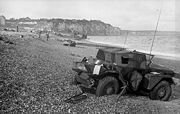
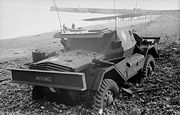
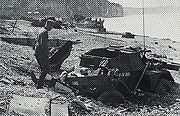
HUNTER, fitted with two No. 19 Wireless sets and with Major Rolfe as the radio operator, was towed off Tank Landing Craft 7 (TLC-7) by a Churchill tank named BLOODY. TLC-7 landed in the centre of Red and White Beaches at about 0605 hrs as part of the second flight of TLCs to land. Once ashore, BLOODY realized it couldn't cross the sea wall in the area where it landed, stopped and started to reverse without releasing the scout car. Maj Rolfe pushed the warning button to notify the tank which then stopped reversing and moved off to the right. Unfortunately when BLOODY reversed, it drove the front of the scout car into the chert and there it remained. The scout car, although looking like a derelict to the enemy, still had functional radios and served as a critical link in the operation. Joined by L/Cpl Wills from HOUND and Brigadier Southam whose own communications were destroyed, Rolfe was able to communicate with the infantry and armoured forces ashore and the ships out to sea by continually changing frequencies. Thus HUNTER became a critical link between the flotilla and the beach for the duration of the operation. It was by this means that the withdrawal of the forces on the beach was arranged. Having stayed behind to arrange the withdrawal, Rolfe burned his signal books and codes[17] and destroyed his equipment with a grenade before being forced to surrender to the German forces[18]. He was awarded the Distinguished Service Order for his gallant and distinguished service at Dieppe[19].Of the 14 members of 1 CATB Sigs who participated in the raid, one was killed in action, five were taken prisoner and eight, including two wounded, returned to England. Major Rolfe was awarded the Distinguished Service Order and L/Cpl Wills was Mentioned in Despatches.
Canadian Signals Participants
| Rank | Name | Unit | Attached to | Ship / Landing craft | Status | Dieppe Award | Notes |
|---|---|---|---|---|---|---|---|
| Capt | Finch, William Henry | 2 Div Sigs | HMS Fernie | MID | |||
| Lt-Col | Macbeth, John Douglas | 2 Div Sigs | HMS Calpe | ||||
| Capt | Maclean, KC | 2 Div Sigs | 6 Bde Alt HQ | TLC 9 | |||
| Lieut | Morrall, Aleck James | 2 Div Sigs | Beach Signalmaster - White Beach Group | LST2 (or TLC 5?) | Wounded - Severly lacerated right arm | MID | |
| Maj | Rolfe, Gordon MacDonald | 1 CATB Sigs | The Calgary Regiment (14 CATR) | TLC 7 | Prisoner of War | DSO | Scout car HUNTER |
| Capt | Warner, D.B.D. | 2 Div Sigs | 4 Bde HQ | TLC 8 | Wounded | MID | |
| Sigmn | Adams, Arthur Keith | 2 Div Sigs | The Royal Regiment of Canada | Killed in Action | |||
| Sigmn | Allen, Hugh F. | 2 Div Sigs | 6 Bde HQ | TLC 7 | Wounded - Gun shot wound right shoulder | ||
| Sigmn | Anderson, R.R. | 2 Div Sigs | 6 Bde HQ | TLC 7 | |||
| L/Cpl | Beck, R.P. | 2 Div Sigs | |||||
| Sigmn | Bennett, Theodore John | 2 Div Sigs | The South Saskatchewan Regiment | Prisoner of War | |||
| Sigmn | Berry, J | 2 Div Sigs | The Essex Scottish Regiment | Prisoner of War | |||
| L/Cpl | Blick, A.E. | 2 Div Sigs | |||||
| Sigmn | Browne, Wallace John | 2 Div Sigs | Fusiliers Mont-Royal | Killed in Action | |||
| Sigmn | Burke, J.J.E. | 2 Div Sigs | |||||
| Sigmn | Campbell, D.R. | 2 Div Sigs | |||||
| Sigmn | Carrier, William George | 2 Div Sigs | The Royal Regiment of Canada | Died of wounds | |||
| L/Cpl | Chambers, L.V. | 1 CATB Sigs | The Calgary Regiment (14 CATR) | TLC 9 | Scout car HARE | ||
| Sigmn | Cohen, J. | 1 CATB Sigs | |||||
| Sigmn | Crosby, James Frederick | 2 Div Sigs | The Essex Scottish Regiment | Prisoner of War | MM | ||
| Sigmn | Dean, Thomas Malcolm | 2 Div Sigs | Fusiliers Mont-Royal | Killed in Action | |||
| Sigmn | Dickman, J.H. | 2 Div Sigs | The Cameron Highlanders of Canada | ||||
| Sigmn | Ellwood, Geoffrey | 2 Div Sigs | The Essex Scottish Regiment | Prisoner of War | |||
| Sigmn | Flood, C.E. | 2 Div Sigs | |||||
| Sigmn | Foster, Harold Clifton | 2 Div Sigs | The Royal Regiment of Canada | Killed in Action | |||
| Sigmn | Friend, A.E. | 1 CATB Sigs | |||||
| Sigmn | Gilbert, Stanley Earl | 2 Div Sigs | 4 Bde HQ | TLC 8 | Slightly Wounded | MM | |
| Cpl | Gorman, T.B. | 2 Div Sigs | |||||
| Sigmn | Grand, John J. | 2 Div Sigs | HMS Calpe | ||||
| L/Sgt | Hanna, Lloyd F. | 2 Div Sigs | |||||
| Sgt | Hart, David Lloyd | 2 Div Sigs | 4 Bde Alt HQ | TLC 10 | MM | ||
| Sigmn | Heather, Jack D. | 1 CATB Sigs | Wounded | ||||
| Sigmn | Henderson, Eric Patrick | 2 Div Sigs | The South Saskatchewan Regiment | Prisoner of War | |||
| Sigmn | Hilt, George Everett | 2 Div Sigs | The Royal Hamilton Light Infantry | Presumed Killed in Action | |||
| Sigmn | Howard, John | 2 Div Sigs | 6 Bde HQ | TLC 7 | |||
| L/Cpl | Hunter, William | 2 Div Sigs | The Royal Hamilton Light Infantry | Prisoner of War | MID | ||
| Sigmn | Kern, J.A. | 1 CATB Sigs | |||||
| Sigmn | Kirk, J.M. | 2 Div Sigs | |||||
| L/Cpl | Knox, J.G. | 2 Div Sigs | Wounded - slight wounds | ||||
| L/Cpl | Kryzanowski, Anthony Richard | 2 Div Sigs | HMS Calpe | Wounded - shrapnel | MID | ||
| Sigmn | Lacusta, Leo William | 2 Div Sigs | 4 Bde Alt HQ | TLC 10 | MID | ||
| Sigmn | Lewis, G.V. | 2 Div Sigs | 6 Bde HQ | TLC 7 | |||
| Sigmn | MacMillan, RS | 2 Div Sigs | Fusiliers Mont-Royal | ||||
| L/Cpl | Marlow, F.E. | 2 Div Sigs | |||||
| Sigmn | Marsh, Keith Lloyd | 2 Div Sigs | The South Saskatchewan Regiment | Killed in Action | |||
| Sigmn | Millington, Arhtur Roy | 2 Div Sigs | 6 Bde Alt HQ | TLC 9 | Prisoner of War | ||
| Sigmn | Ness, William James | 2 Div Sigs | 4 Bde Alt HQ | TLC 10 | MID | ||
| A/LCpl | Olsen, Sydney Theodore | 1 CATB Sigs | Prisoner of War | ||||
| Sigmn | Ponting, George Lewis | 1 CATB Sigs | Prisoner of War | ||||
| L/Cpl or Sigmn | Popham, Reginald Rex | 2 Div Sigs | 6 Bde Alt HQ | TLC 9 | Prisoner of War | ||
| Sgt | Prest, R.J. | 1 CATB Sigs | Wounded | ||||
| Sigmn | Ray, William John | 2 Div Sigs | The Cameron Highlanders of Canada | MM | |||
| Cpl | Reekie, Morley Howard Gregg | 2 Div Sigs | 4 Bde | Slightly Wounded | MID | ||
| L/Cpl | Rickard, Douglas Ross | 2 Div Sigs | 6 Bde Alt HQ | TLC 9 | |||
| Sigmn | Roberts, J.L. | 2 Div Sigs | 6 Bde HQ | TLC 7 | Wounded - Gun shot wound left heal | ||
| L/Cpl | Rudd, J.O. | 2 Div Sigs | Wounded - Gun shot wound | ||||
| Sigmn | Russell, F.M. | 2 Div Sigs | |||||
| L/Cpl | Sanderson, J.F. | 2 Div Sigs | |||||
| Sigmn | Schlier, Maxwell Ralph | 2 Div Sigs | The Cameron Highlanders of Canada | Prisoner of War | |||
| Sgt | Scott, C. | 2 Div Sigs | 6 Bde HQ | TLC 7 | Wounded - Gun shot wound arm | ||
| Sigmn | Smith, William Hasan | 1 CATB Sigs | Killed in Action | ||||
| Sigmn | Stansbury, J.E. | 2 Div Sigs | |||||
| L/Cpl | Steel, Garnet James | 2 Div Sigs | HMS Calpe | ||||
| L/Cpl | Stephenson, John Fletcher | 2 Div Sigs | 6 Bde Alt HQ | TLC 9 | Prisoner of War | ||
| Sigmn | Stockman, J.V. | 2 Div Sigs | |||||
| Sigmn | Stride, Herbert Henry | 2 Div Sigs | 6 Bde Alt HQ | TLC 9 | Prisoner of War | ||
| Sigmn | Sutherland, D. | 2 Div Sigs | |||||
| Sigmn | Taylor, A.M. | 2 Div Sigs | |||||
| Sigmn | Tomarelli, W.J. | 1 CATB Sigs | |||||
| Sigmn | Tudge, F.R. | 2 Div Sigs | |||||
| L/Sgt | Upton, Robert Cecil Stowe | 2 Div Sigs | 6 Bde HQ | TLC 7 | Presumed Killed in action | ||
| A/Sgt | Ward, J.C. | 2 Div Sigs | |||||
| Sigmn | Watt, Lloyd Alexander | 2 Div Sigs | 6 Bde Alt HQ | TLC 9 | Prisoner of War | ||
| L/Cpl | Webber, E.C. | 2 Div Sigs | |||||
| Sigmn | Williams, Thomas Brinsley | 1 CATB Sigs | Prisoner of War | ||||
| L/Cpl | Wills, Albert George | 1 CATB Sigs | The Calgary Regiment (14 CATR) | TLC 10 | Prisoner of War | MID | Scout car HOUND |
| Sigmn | Wood, John Raymond | 2 Div Sigs | The Royal Hamilton Light Infantry | Prisoner of War | |||
| Sigmn | Zillinsky, Andrew | 1 CATB Sigs |
See Also
References and Notes
- ↑ 1.0 1.1 1.2 1.3 Wikipedia - Dieppe Raid
- ↑ Special thanks to Major (Ret'd) Dave Lawrence who provided significant research and content for this page.
- ↑ 3.0 3.1 Wikipedia - Operation Jubilee order of battle
- ↑ The name style used in this article is the one in use at the time of the Dieppe Raid. Later in the war, the name was changed to the commonly known "Landing Craft, Tank" (LCT).
- ↑ Moir, History of the Royal Canadian Corps of Signals 1903-1961, 115-117.
- ↑ CO HQ, C.B. 04244, Report on The Dieppe Raid, Annex 10, para 1072.
- ↑ See Combined Operations Pamphlet No. 6B, The Beach Signal Unit, 1943 for more details on the Beach Signal Station's composition and function
- ↑ CO HQ, C.B. 04244, Report on The Dieppe Raid, Appendix Q to Annex 2.
- ↑ CO HQ, C.B. 04244, Report on The Dieppe Raid, Annex 10, para 1071.
- ↑ CO HQ, C.B. 04244, Report on The Dieppe Raid, Appendix A to Annex 10, para 1141; and letter LCol Macbeth, CO 2nd Div Sigs to GOC 2nd Div dated 22 Aug 42 para 7. (g).
- ↑ War Diary, 1st CAB, 19 August 1942.
- ↑ War Office, Training Manual - Signalling (Provisional) 1915 (London: HMSO, 1915), Chapter VIII and War Office, Sig Trg (All Arms) 1938, Section 81.
- ↑ Canadian Military Headquarters, Report 108 – Operation "JUBILEE" Part II (Ottawa: Historical Section, CMHQ, 12 July 1950), paras 66 and 143.
- ↑ CMHQ, Report 108 – Operation "JUBILEE" Part II, para 265.
- ↑ CO HQ, C.B. 04244, Report on The Dieppe Raid, Appendix Q to Annex 2 (Signal Order), para 803.
- ↑ Letter from Maj. Rolfe to Mr. Hugh Henry 11 February 1991 and Major Rolfe’s Personnel Files in Archive of Communications and Electronics Museum, Kingston.
- ↑ Rolfe noticed that Brigadier Southam still had his copy of the military plan as the surrender started and repeatedly asked to add it to the fire. Southam refused feeling he still needed at and later unsuccessfully tried to bury it on the beach. Dieppe, The Shame and the Glory; Terrance Robertson, Little, Brown and Company. Page 379
- ↑ Dieppe, The Shame and the Glory; Terrance Robertson, Little, Brown and Company. Page 379
- ↑ The London Gazette, Supplement 37499. 12 March, 1946. Page 1367.
